How To Add An Extra Field For Capturing Student Behavior Infractions In Opensis
When recording a behavior infraction for a student in openSIS,CrownSIS, it’s important to capture all relevant details accurately. Sometimes, the default fields provided may not cover all the information you need. In such cases, you can add an extra field to the behavior record form. This guide will walk you through the process.
Step 1: Navigate to Behavior Fields
-
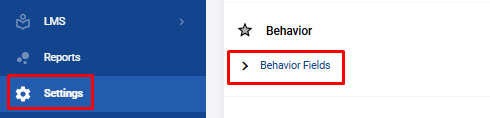
Go to Settings:
- From the navigation menu, click on Settings to access various configuration options in
openSIS.CrownSIS.
- From the navigation menu, click on Settings to access various configuration options in
-
Access Behavior Fields:
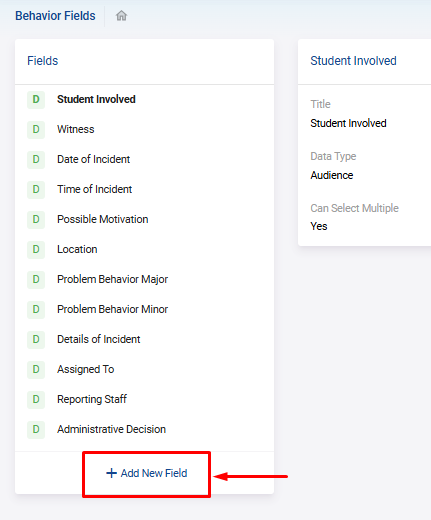
- Under the Behavior section, select Behavior Fields. Here, you’ll see a list of fields that currently appear by default when adding a behavior issue for a student.
Step 2: Add a New Behavior Field
-
Click on "Add New Field":
- To create a new field, click on the Add New Field button. This will open a form where you can define the details of the new field.
- To create a new field, click on the Add New Field button. This will open a form where you can define the details of the new field.
-
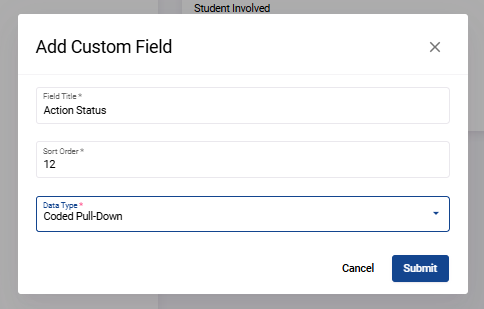
Enter Field Details:
- Field Name: Provide a name for the new field. This is the label that will appear when adding a behavior record.
- Sort Order: Specify the sort order for this field, which determines where it will appear in relation to other fields.
- Field Type: Choose the type of field you want to add. The options include:
- Text Field
- Date Field
- Multiple Select Box
- Coded Pull-Down (a drop-down menu with pre-defined options)
-
Submit the New Field:
- After entering all the necessary details, click on Submit to save the new field.
Step 3: Configure Selection Choices for Coded Pull-Down Fields
-
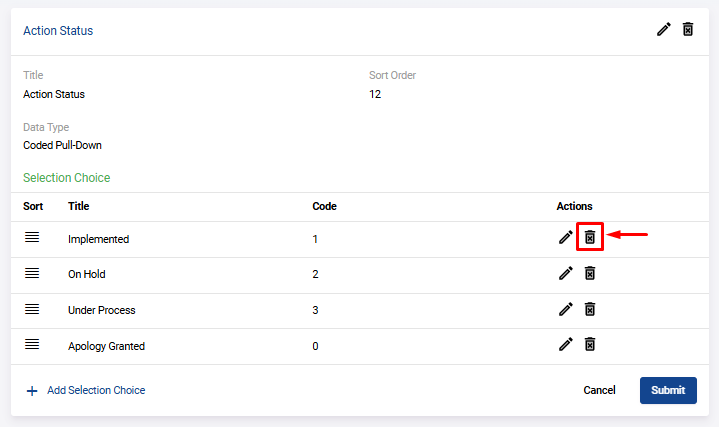
Add Selection Choices:
- If the new field type is a Coded Pull-Down , you’ll need to define the selection choices. Click on Add Selection Choice to open the choice configuration window.
- If the new field type is a Coded Pull-Down , you’ll need to define the selection choices. Click on Add Selection Choice to open the choice configuration window.
-
Define Choices:
- Title: Enter the title for each selection choice (e.g., "Minor Infraction").
- Code: Assign a code that corresponds to each title (e.g., "MNR").
- You can add multiple selection choices by repeating the process.
-
Remove a Choice (if necessary):
- To remove an unwanted choice, click on the trash icon next to the choice you wish to delete.
- To remove an unwanted choice, click on the trash icon next to the choice you wish to delete.
-
Save Choices:
- Once all choices are added, click on Submit to save them.

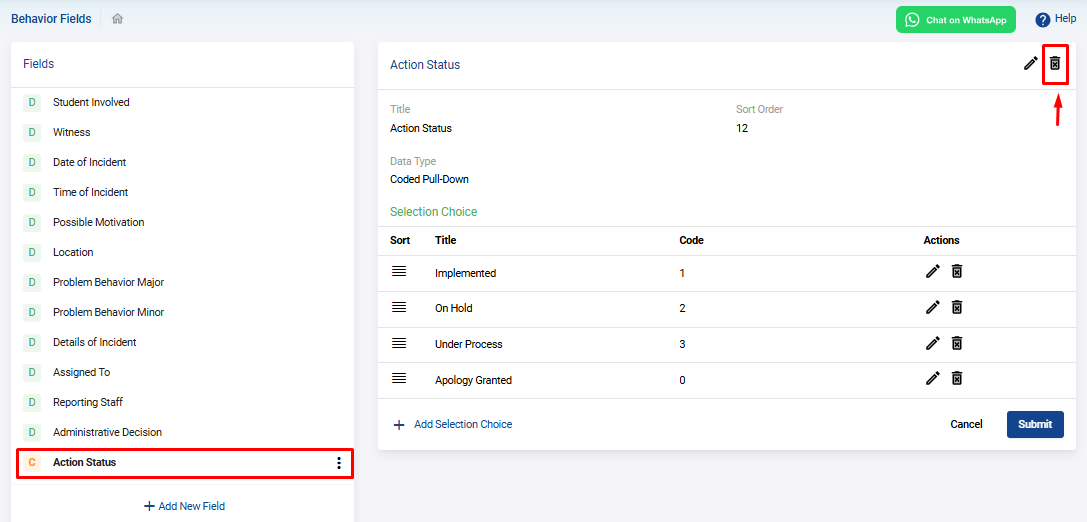
Step 4: Delete a Custom Behavior Field
-
Access the Behavior Field:
- If you wish to delete a custom-made behavior field, go to the Behavior Fields list and click on the newly added field.
-
Delete the Field:
- On the details page that opens, click on the Trash icon located at the top right side of the page. This will delete the custom behavior field from the list.
- On the details page that opens, click on the Trash icon located at the top right side of the page. This will delete the custom behavior field from the list.
Step 5: Use the New Field in Behavior Records
- Add a Behavior Record:
- When you add a new behavior record for a student, the new field you created will now appear in the form. This allows you to capture the additional information required for the behavior infraction.
By following these steps, you can easily customize the behavior recording process in openSISCrownSIS to better fit your school’s needs. Adding extra fields ensures that all necessary details are captured accurately, allowing for more effective tracking and management of student behavior.