School Information
- Add A School
- Add Mental Health Information
- How To Add A Calendar For Your School
- How To Copy A School In CrownSIS
- How To Create Custom Categories And Fields For A School In CrownSIS
- How To Extend A School Calendar Beyond 365 Days
- Marking Events And Holidays In CrownSIS
- School Notices
Add A School
Add New School
After logging in to CrownSIS you can create a new school. Click on the**'+'** button on the top right corner of the page
Here you will find options to create a new school, new student, new staff, a new event in the calendar, and notices and can bulk import student and staff data.
Click on School. You will be redirected to a page where you will see a pop-up where you are required to fill out the school's beginning date for this school year.
After submitting the form you will be on the school information page to fill out the school details. You can start with the mandatory fields and slowly populate all the fields.
In the Address Information section, enter all the fields and the system will automatically Google map the address.
In the Contact Information section, the Principal's name and Telephone number fields are mandatory. After entering that information, click Submit.
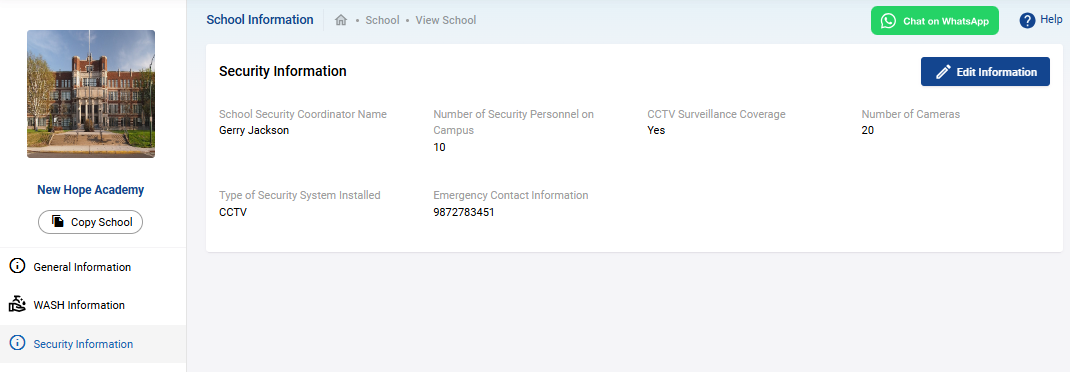
You will see the following screen where you can capture water, sanitation, and hygiene information.
 Before you can enter data in the drop-down fields, you must to Settings >> List of Values and enter the WASH-related data
Upload School Logo
To upload the school logo, click on the default logo placeholder image. The file selection box will open where you will be able to select the logo from your computer. After you do so, it gets uploaded and will display at the logo placeholder.
Once the logo is uploaded, it will appear on progress reports, report cards, and transcripts.
View All Schools
To view all schools within your account, click on view all schools and it will list the schools that you have access to.
Adding Custom Category and Fields to Capture Additional Information
Sometimes there is a need for a school to capture additional information than what is already provided in the system as default. You can create custom categories to organize your information and add multiple fields within each category.
Follow this article to read how to create custom categories and fields.
Add Mental Health Information
Mental health information displayed to students has become a necessity for schools. CrownSIS allows an administrator to quickly add such information and display it on the school portal.
Mental Health Info will show on the Dashboard as soon as the user login into the site.
Click on**'+ Add New'** and**** a new mental health setup page will popup.
-
Add 'Title'
-
Add 'Body'
-
Add 'Sort order'
-
Select 'Visible To Profile' from the option given below
-
Click 'Submit' to publish the mental health info on the dashboard

You can publish this for Students only by checking visible to Student
How To Add A Calendar For Your School
Managing the academic calendar is crucial for keeping the school’s schedule organized and accessible. Here’s a guide on how to add a new calendar for your school, ensuring that it is appropriately configured for school operations.
Step-by-Step Guide to Adding a Calendar
Step 1: Access the Calendar Management Section
Step 2: Click on the 'Add Calendar' Button
Once you’re in the calendar management section, locate and click on the “Add Calendar” button. This will initiate the process of creating a new calendar.
Step 3: Enter a Title for the Calendar
Provide a descriptive title for the calendar that clearly identifies its purpose or time frame, such as “2024-2025 Academic Year”.
Step 4: Set as Default Calendar (Optional)
If you wish to make this new calendar the default calendar for the school, click on the checkbox labeled “Default calendar for this school.” This step is optional and should only be used if this calendar will be the primary one used by the school.
Step 5: Enter Start and End Dates
Specify the start and end dates for the calendar. This is crucial for defining the period this calendar will cover. For example, you might set the start date as July 1, 2024, and the end date as June 30, 2025.
Step 6: Mark Operational Days
Check the boxes corresponding to the days of the week on which the school operates under this calendar. This ensures that the calendar reflects the actual days the school is open for instruction.
Step 7: Assign Visibility to Profiles
Determine who will have access to view this calendar. Check the boxes next to the profiles or groups of users, such as teachers, students, and administrators, who need access to this calendar.
Step 8: Submit and Create the Calendar
After reviewing all the entered information, click on the 'Submit' button. This action will create the new calendar and make it accessible to the designated profiles.
Conclusion
By following these steps, you’ve successfully added a new calendar to your school’s administrative system. This calendar will now serve as a vital tool for organizing school operations and ensuring everyone stays informed about important dates and events. Remember to periodically review and update the calendar to reflect any changes in the school’s schedule.
How To Copy A School In CrownSIS
Copying a school in CrownSIS is a useful feature that allows you to quickly create a new school by duplicating the setup and configurations of an existing one. This can save you time and ensure consistency across multiple schools within your organization. Here’s a step-by-step guide on how to do it.
Step 1: Navigate to School Information
-
Go to Schools:
- From the navigation menu, click on Schools to access the list of schools managed in CrownSIS.
-
Access School Information:
- Select School Information from the options available under Schools. This will take you to the details page of the current school you wish to copy.
Step 2: Initiate the Copy Process
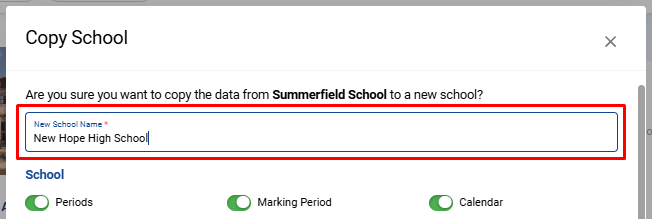
- Click on "Copy School":
- Under the actual school name, you’ll find a button labeled Copy School. Click on this button to begin the process of copying the school.

Step 3: Configure the New School
-
Enter the New School’s Name:
- A modal window will appear where you need to enter the name of the new school. This is the name that will be assigned to the copied school.
-
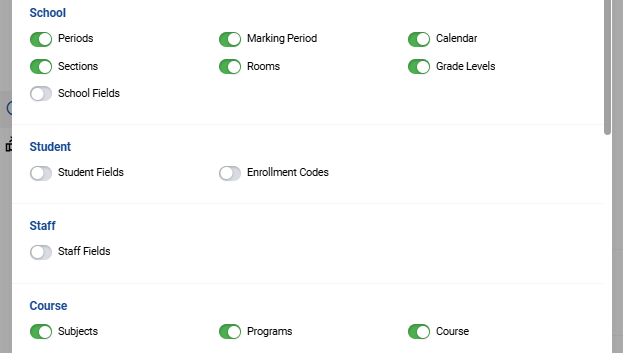
Select Items to Copy:
- In the same modal, you’ll see options to switch on or off the items you wish to copy from the current school to the new school. These items might include things like:
- School Calendar
- Grade Levels
- Student Fields
- Staff Fields
- Courses and Sections
- Switch on the items you want to include in the new school and switch off the ones you do not wish to copy.
- In the same modal, you’ll see options to switch on or off the items you wish to copy from the current school to the new school. These items might include things like:
Step 4: Create the New School
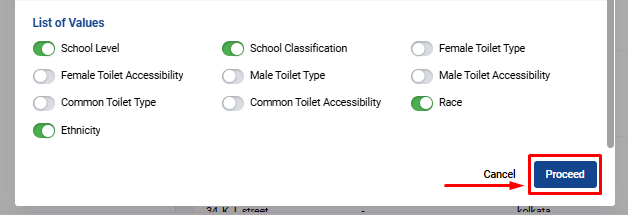
-
Click on Proceed:
- Once you’ve selected the items to copy, click the Proceed button. This will initiate the creation of the new school with the configurations and data you’ve chosen to duplicate.
-
Confirmation:
- After the process is complete, the new school will be created and added to your list of schools in CrownSIS, with the selected items successfully copied over.
By following these steps, you can efficiently create a new school in CrownSIS by copying the setup from an existing one. This feature is particularly useful for managing multiple schools with similar configurations, ensuring that your setup is consistent across the board.
How To Create Custom Categories And Fields For A School In CrownSIS
Creating custom categories and fields in CrownSIS allows you to store and manage school-specific information tailored to your unique needs. Here's a step-by-step guide on how to create custom categories and fields for your school.
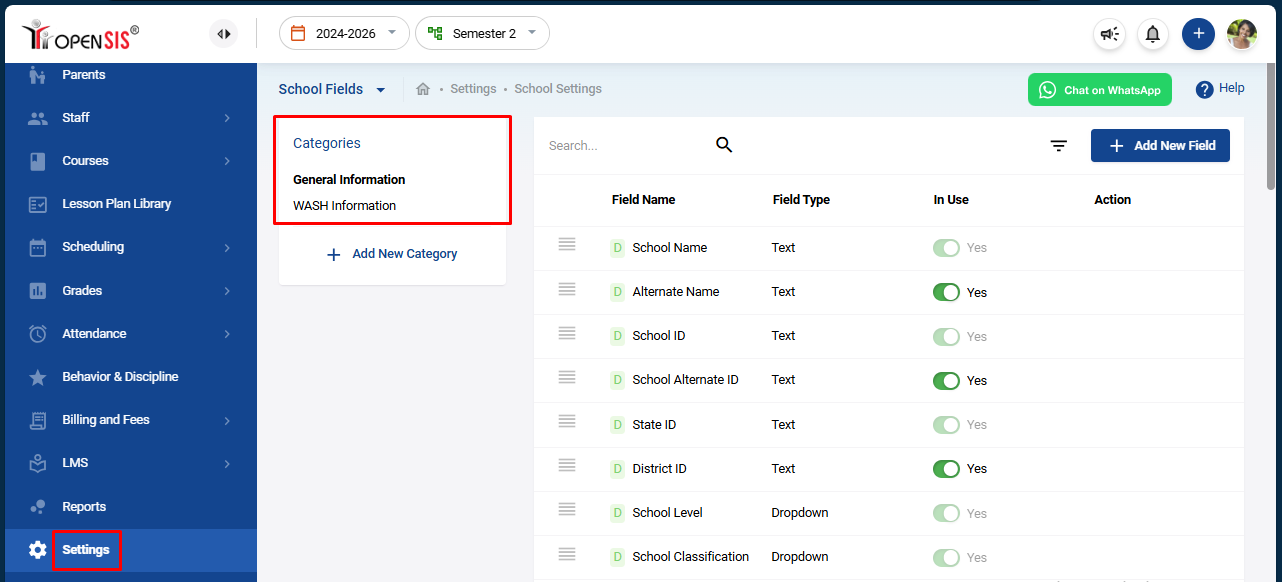
Step 1: Access the School Fields Settings
-
Log in to your CrownSIS account.
-
From the navigation panel, go to Settings.
-
Under the School header, select School Fields.
Here, you’ll see the existing categories like General Information and Wash Information.
Step 2: Add a New Category
-
Click on "Add Category":
- At the top of the categories list, click the Add Category button.
-
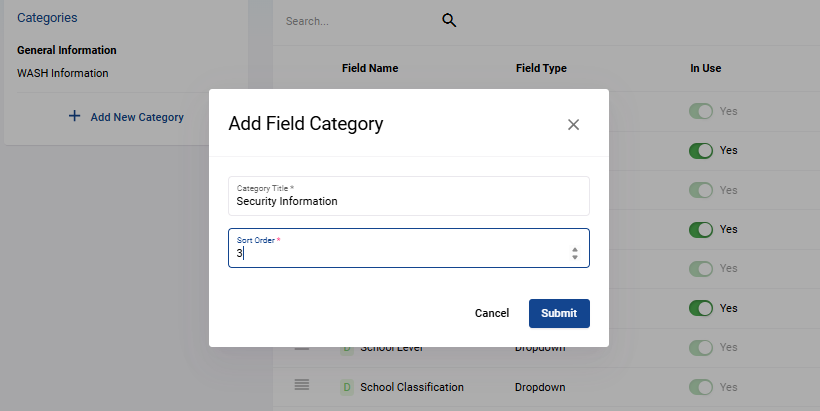
Enter Category Details:
- A modal will open where you’ll need to input the Category Name.
- Enter the Sort Number to determine the order in which this category will appear in relation to other categories.
-
Submit the Category:
- Once you’ve entered the details, click Submit to add the new category.
Step 3: Add Custom Fields to the Category
-
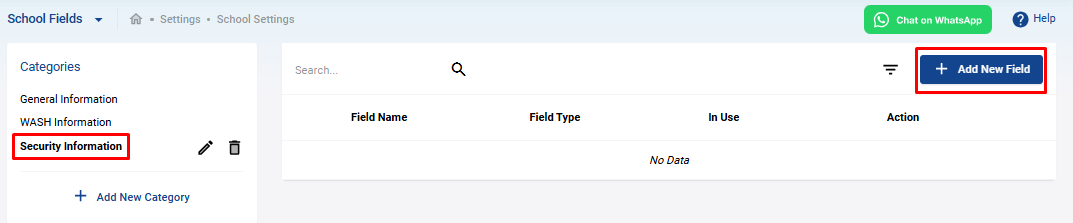
Select the Category:
- Click on the name of the category you just created.
-
Click on "Add New Field":
- In the top right corner, click the Add New Field button.
-
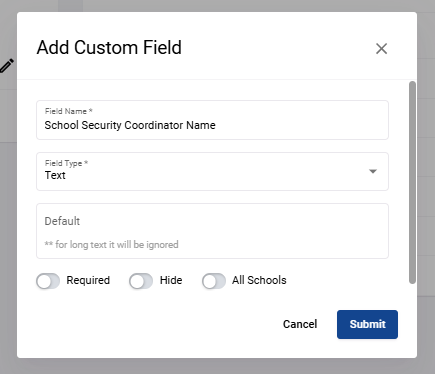
Enter Field Details:
- Field Name : Enter the name of the field.
- Field Type : Select the field type from the dropdown menu. Options include checkbox, radio button, textbox, or simple text field.
- Default Value : If the field requires a default value, enter it in the Default field.
-
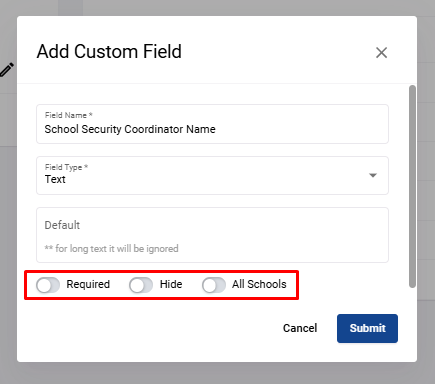
Configure Field Options:
- Required : Toggle this switch to make the field mandatory for users.
- Hide : Toggle this switch if you want to keep the field hidden from the form.
- All Schools : Toggle this switch to make the field visible in the form for all schools.
-
Submit the Field:
- After filling in the necessary details, click Submit to add the new field.
Step 4: Verify the New Category and Fields
- After creating the category and fields, go back to the School Information section under Schools and check if the new category appears in the navigation submenu.
By following these steps, you can easily create custom categories and fields that suit your school's specific requirements, allowing you to manage information more effectively in CrownSIS.
How To Extend A School Calendar Beyond 365 Days
Extending a school calendar beyond the default 365 days can be crucial for institutions needing more flexibility in their academic scheduling. This step-by-step guide will walk you through the process of adjusting the calendar to fit your specific needs.
Step-by-Step Instructions
Step 1: Navigate to the Menu
- Start by logging into your school management system.
- Once logged in, locate the Menu option, typically found in the top or side navigation bar.
Step 2: Select 'School' and then 'Calendars'

Step 3: Find the Calendar to Edit
- Scroll through the list of calendars to find the one you wish to extend. Each calendar should be labeled by name and the academic year or term it pertains to.
Step 4: Edit the Calendar
- Once you've identified the correct calendar, look for the pencil icon next to it, which indicates the "Edit" function. Click on the pencil icon to enter the edit mode.

Step 5: Adjust the End Date
- Within the calendar settings, locate the field labeled End Date. This field typically contains the pre-set last day of the school year or term.
- Click on the End Date field, and a date-picker or calendar tool will appear.
- Select your desired end date, whether it's one day, one week, or several months beyond the default 365-day mark.

Step 6: Save Your Changes
- After setting the new end date, click the Update or Save button to apply the changes.
- The system will confirm that your changes have been saved successfully.
Once you've completed these steps, you have officially extended the school calendar. Be sure to inform relevant staff and stakeholders of the new end date to ensure that the extended calendar is reflected in all academic planning and scheduling.
By following these simple steps, you can easily modify your school calendar to extend beyond the typical 365-day limitation. This flexibility ensures that your institution can accommodate special circumstances, such as extended academic years or unique scheduling requirements.
Marking Events And Holidays In CrownSIS
It’s essential to mark events and holidays in the school calendar to keep everyone informed and ensure smooth operations. Here’s a step-by-step tutorial on how to mark events and holidays in CrownSIS.
Step 1: Access the School Calendar
Step 2: Add an Event or Holiday
- Choose a Date: Click on the specific calendar date on which you want to add the event or holiday.
Step 3: Enter Event Details
-
Title: Enter the title of the event or holiday to provide a clear and concise description.
-
Start and End Dates: Set the start and end dates for the event or holiday.
-
Notes: Add any additional details in the “Notes” section if needed.
Step 4: Customize the Event Appearance
- Choose Color: Select a color for the event to make it easily identifiable on the calendar.
Step 5: Set Event Visibility
- Select Profiles: Check the profiles whose calendars you wish to mark, such as students, teachers, and staff.
- Apply to All Schools (Optional): If you want to apply this event or holiday to all schools, switch on the “Apply to All Schools” option.
Step 6: Save the Event or Holiday
- Submit: Finally, click “Submit” to save the event or holiday in the calendar.
By following these steps, you can efficiently mark events and holidays in the CrownSIS calendar, ensuring that all relevant parties are aware of important dates and school activities. With a Holiday and an Event marked on your calendar, it will look like this:
School Notices
Notices allow you to create a school notice that will be displayed on the Dashboard.
When you select the 'Current' tab on the top right corner you can see the current active notices listed below.
When you select the 'Upcoming' tab on the top right corner you can see the upcoming date's notices listed below.
When you select the 'Past' tab on the top right corner you can see the past date's notices listed below.
To start with creating a notice click on '+ Add Notice' and a popup notice setup page will appear.
Here you will need to add:
-
Title of the notice.
-
Body text of the notice. This section has a WYSIWYG editor, which allows you to insert external website links as well as color and format the body text.
-
From and to dates - these dates let you control the visibility of a notice by date.
-
Sorting order to your notice.
-
Click on 'Visible to All School' if you want this to be visible for all schools within your account.
You can select 'Visible To Profile' from the options below to target a particular notice to a particular audience.
Click Submit to save the notice.