Grades
- Addedit Historical Grades And Historical Marking Periods
- Edit Report Card Grades Marked By Teachers
- How To Set Graduation Requirements In CrownSIS
- How To Set Up An Effort Grade System
- Setting Up Standards Based Grading In CrownSIS
Addedit Historical Grades And Historical Marking Periods
Add/Edit Historical Grades and Historical Marking Periods
Login as an administrator and navigate to Grades >> Administration
In this area of the system, there are two major functionalities. One is to Edit Report Card Grades received by students and the other is to Add/Edit Historical Grades.
Click on the Add/Edit Historical Grades. Select a student from the list, or search and select.
You will get a screen like this:
If you do not have any historical marking periods defined in the system, you can click on the link (marked by the red arrow) and it will take you to the historical marking period entry screen. A sample is given below:
To continue with the data entry, fill out the following fields:
-
Select the Marking Period from the drop down. This will show the marking period you just created using the historical marking period entry.
-
Enter the name of the school the student was attending during that marking period
-
Select the grade level in which the student was enrolled in that school
-
Enter the course code
-
Enter the course name
-
Enter the grade percentage received
-
Enter the equivalent letter grade received
-
Enter the GP value
-
If you want this grade item to be included in GPA calculation, then turn on the toggle switch
-
Select the course type
-
Enter grade scale
-
Enter credit attempted
-
Enter credit earned
Submit the form. The data will be saved and it will reflect on the student's Transcript.
To add more courses, click on the +Add another Course link and repeat the steps listed above.
To add another marking period click on +Add Another Marking Period at the bottom of the screen.
Edit Report Card Grades Marked By Teachers
Login as an administrator and navigate to Grades >> Administration
In this area of the system, there are two major functionalities. One is to Edit Report Card Grades received by students and the other is to Add/Edit Historical Grades.
To edit report card grades received by students from their course teacher, select a student from the list, or search and select.
Once selected, it will display the grades received like given below in the screenshot. Suppose you want to change his grade from D to B, click on the pencil icon and edit the grade and then click update. The grade will be updated. This change will reflect on the Student's Report Card as well as on the Transcript.
How To Set Graduation Requirements In CrownSIS
Graduation requirements are the specific criteria that students must meet to earn their diplomas, degrees, or certificates. These requirements ensure that students have successfully completed the necessary coursework and accumulated the required credits in various subjects.
In CrownSIS, setting up graduation requirements involves defining the degree programs offered by your institution and the associated course categories. This article will guide you through the steps to set up graduation requirements in CrownSIS.
Step 1: Accessing Graduation Requirements
Step 2: Adding a Degree Program
A degree program in CrownSIS represents the diploma, degree, or certificate that students are working towards. To add a degree program, click on the gear icon.
You will be prompted to input a program name. This name should reflect the degree or certificate, such as "High School Diploma," "Bachelor of Science," or "Certified Nursing Assistant."
Once you've added the program name, the degree program is created and ready for the next step.
Step 3: Adding Course Categories
Course categories represent the different areas of study or subjects that are part of the degree program. Each category requires a certain number of credit hours to be fulfilled by students. To add course categories, follow these steps:
- Click on the Add Course Category button located at the top right-hand side of the Graduation Requirements page.
- Select the degree program for which you want to add the course category.
- Input the category name (e.g., "Mathematics," "Science," "Humanities") and specify the required credit hours for this category.
You can repeat this process to add multiple course categories under the same degree program or across different programs.
Step 4: Assigning Courses to Categories
When creating courses in CrownSIS, you will be asked to select the appropriate course category. This selection assigns the course to the corresponding category within the degree program.
As you add courses to categories, the number of courses assigned to each category is displayed in the Graduation Requirements section under Settings. This feature helps you track the courses that contribute to each category's credit hour requirements.
Step 5: Tracking Graduation Requirements
In the Graduation Requirements section, you can view the required graduation hours for each degree program. These hours are automatically calculated based on the course categories and their associated credit hours.
By following these steps, you can efficiently set up and manage graduation requirements in CrownSIS, ensuring that your students meet all necessary criteria to graduate from your institution.
How To Set Up An Effort Grade System
Setting up an effort grading system can provide a valuable way to assess and motivate students by focusing on their work ethic and engagement. This article will guide you through the step-by-step process of configuring an effort grade system in your school's grade management software.
Step-by-Step Guide to Setting Up Effort Grades
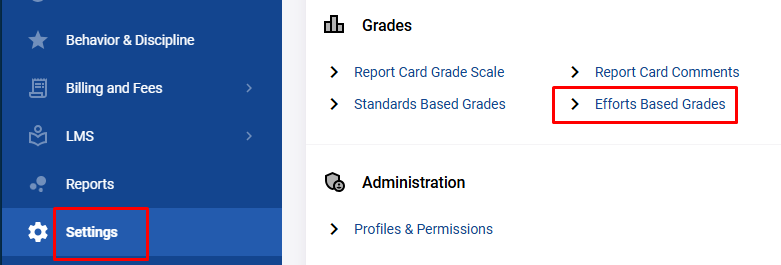
Step 1: Access the Settings Menu
To begin setting up effort grades:
Step 2: Select "Efforts Based Grades"
- Under the Grades section, choose the Efforts Based Grades option.
- This will lead you to the interface where you can configure your effort grade system.
Step 3: Define Effort Grade Scale
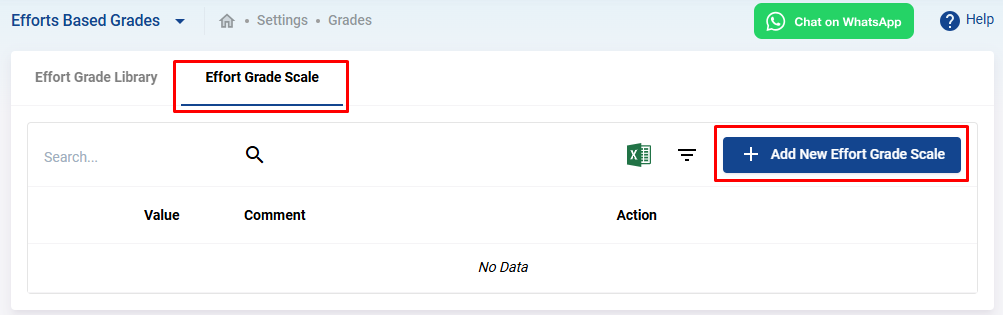
- Click on the Efforts Grade Scale tab to define the scale on which students will be graded based on effort.
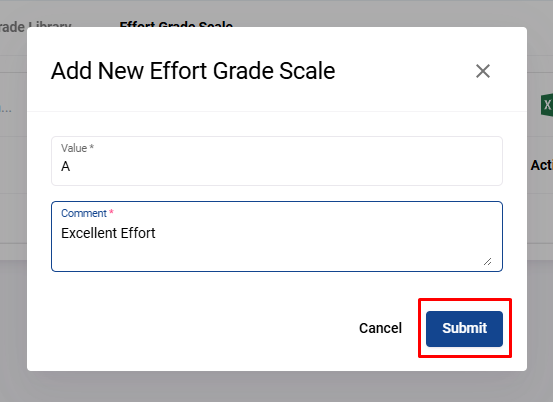
- To add a new scale, click the Add New Effort Grade Scale button.
- A form will appear where you can fill in the grade value (e.g., A, B, C or 1-4) and a description (e.g., Excellent Effort, Satisfactory Effort).
Step 4: Configure the Effort Grade Library
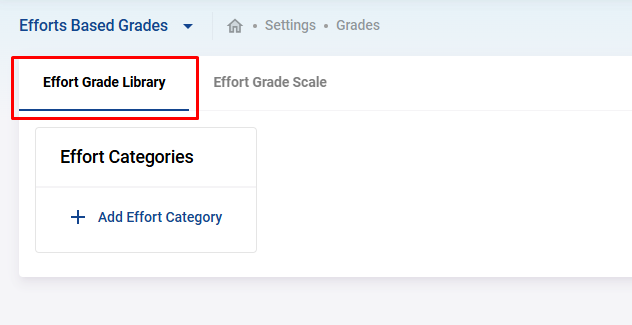
After setting the grade scale, you need to configure the criteria by which students will be assessed.
Step 5: Create Effort Grade Categories
Effort categories represent broader areas under which specific effort items will be grouped, such as Class Participation or Homework Completion.
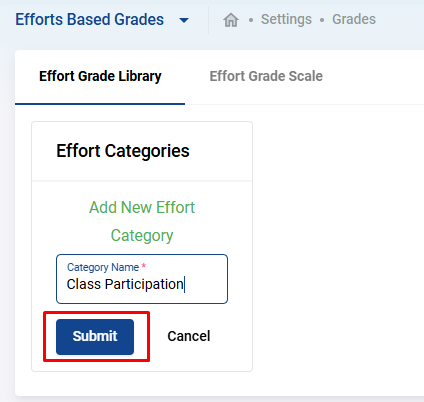
- Click on the Add Effort Category button to create a new category.
- Enter the Category Name (e.g., "Class Engagement" or "Homework Dedication") and click Submit.
Step 6: Add Effort Items
Effort items are specific criteria within each category, representing how students will be graded.
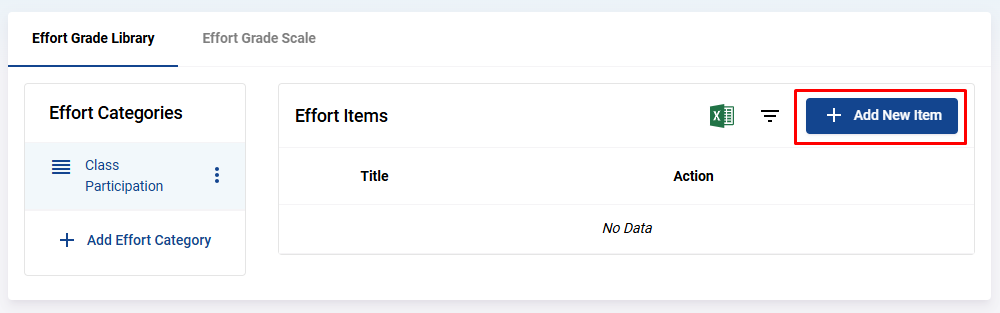
- Once your category is created, click the Add New Item button to add an effort item.
- You will be prompted to provide the Item Title (e.g., "Timely Homework Submission" or "Active Class Discussion") and click Submit.

Managing Effort Grades
Editing Effort Grades or Items
If you need to adjust any existing grades or effort items:
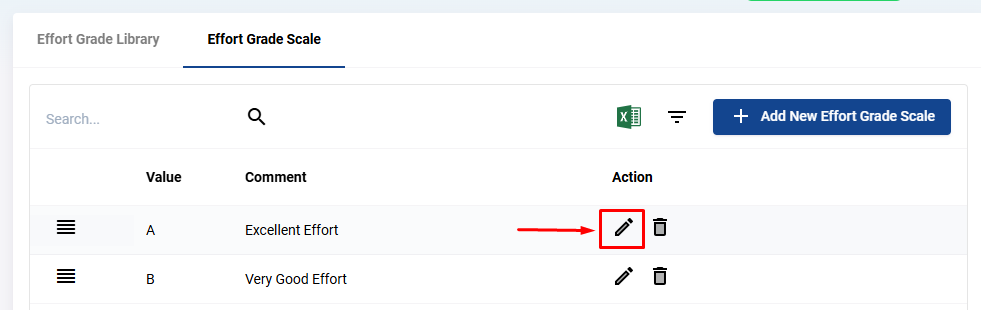
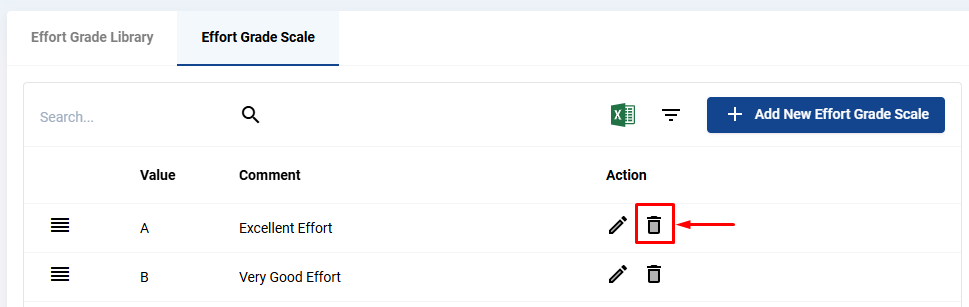
- To edit an effort grade scale , click the pencil icon next to the grade you want to modify.
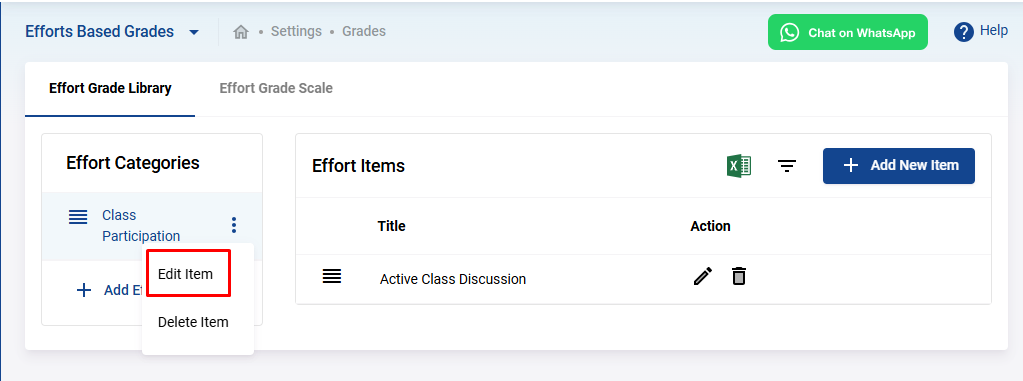
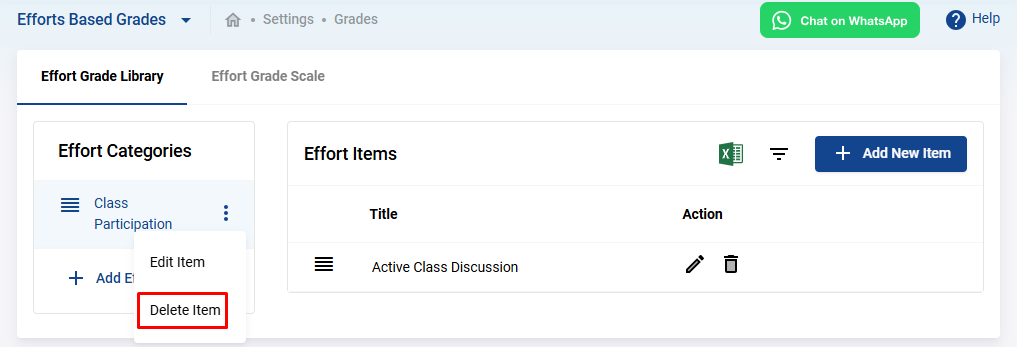
- To edit an effort category , click the three dots next to the category name and select Edit Item.
- For editing effort items , use the pencil icon next to the specific item within the category.
Deleting Effort Grades or Items
In case you need to remove any scale, category, or item:
- To delete an effort grade scale or item , click the trash icon next to it.
- To delete an effort category , click on the three dots next to the category name and select Delete Item.
By following these steps, you can effectively set up an effort grading system that helps track and reward student effort in various aspects of their academic experience. This system not only encourages a strong work ethic but also provides students and teachers with clear criteria for evaluating engagement and effort.
Setting Up Standards Based Grading In CrownSIS
Setting Up Standards-Based Grading in CrownSIS
Standards-based grading (SBG) is a system of evaluating students' mastery of specific learning goals or standards, rather than relying on traditional letter grades. Unlike conventional grading systems that assess performance based on percentages or averages, SBG focuses on how well students have mastered the content in relation to established standards. This approach gives students, teachers, and parents a clearer understanding of student progress and areas needing improvement.
Step-by-Step Guide to Set Up Standards-Based Grading in CrownSIS
Here is how you can set up a standards-based grading system in your school’s information platform.
1. Access the Standards-Based Grades Section
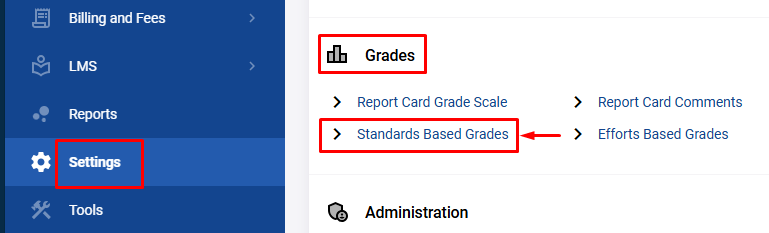
- Start by logging into your school’s system and navigating to the Settings menu from the navigation panel.
- Under the Grades section, look for Standards Based Grades and click on it. This will take you to the area where you can configure your grading system based on the standards.
2. Setting Up the Grade Scale
Before adding the specific standards for each course, you need to set up the grading scale that will be used to assess students’ performance.
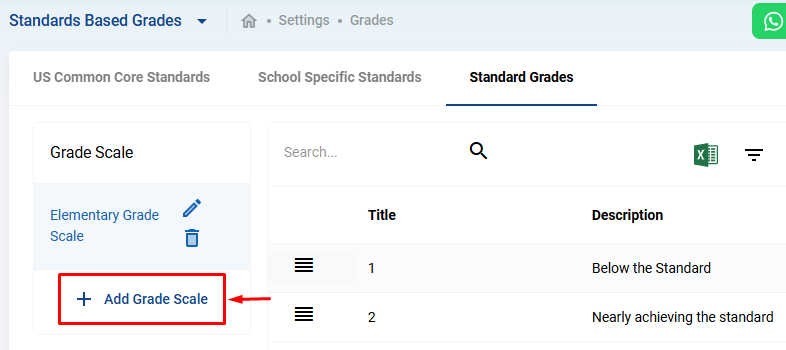
- In the Standards Based Grades area, click on Standard Grades.
- Here, click the Add Grade Scale button to create a new grading scale.
- Give the grading scale a name. For example, you could name it “Mathematics Standards Scale” or “Science Performance Scale” depending on the subject.
3. Adding Specific Grades to the Scale
Once your grading scale is named, it's time to define the performance levels (standards) that students can achieve.
- Click on Add New Grade.
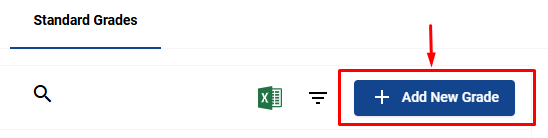
- You will be prompted to add a Title and a Description for each grade level.
- For example:
- Title: “1”
Description: “Below the Standard” - Title: “2”
Description: “Approaching the Standard” - Title: “3”
Description: “Meets the Standard” - Title: “4”
Description: “Achieved the Standard with Excellence”
- Title: “1”
- For example:
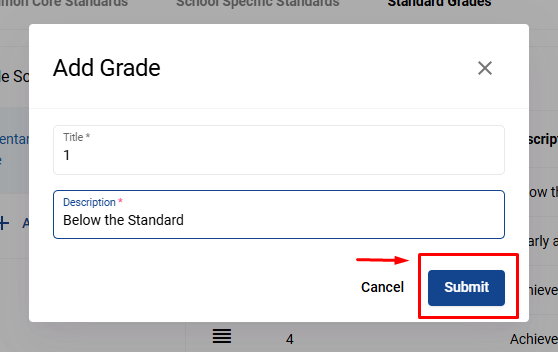
These labels should reflect varying levels of mastery for each standard, helping teachers provide clear feedback.
4. Adding Standards
Now that your grade scale is set, it’s time to add the specific standards that students will be assessed on. These standards will vary based on the subject, course, and grade level.
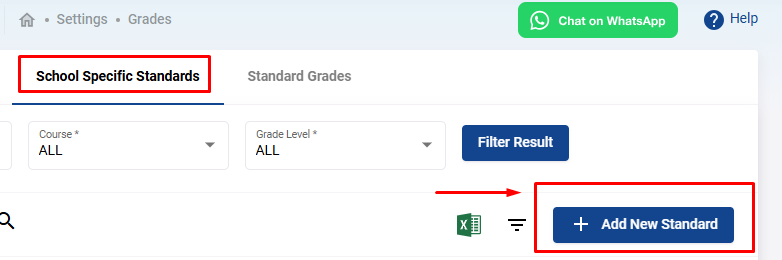
- Go to the School Specific Standards tab.
- To add a new standard, click on the Add New Standard button.
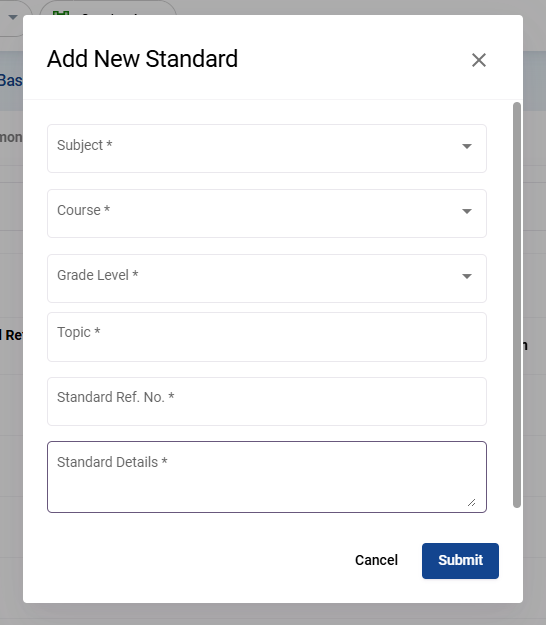
- Fill out the following fields:
- Subject : Select the subject (e.g., Mathematics).
- Course : Choose the course associated with that subject (e.g., Algebra).
- Grade Level : Select the grade level this standard applies to (e.g., Grade 8).
- Standard : Name the specific standard (e.g., Mathematical Reasoning).
- Description : Write a brief description explaining what this standard entails (e.g., “Ability to explain reasoning in basic mathematical processes.”).
5. Applying Standards in Grading
Once the standards and the grading scale are set, teachers can begin using them to assess student performance. For example, in an Algebra class (Mathematics), the teacher might evaluate a student’s “Mathematical Reasoning” based on the standard you set.
- If the student demonstrates a deep understanding of the material, the teacher may assign a “4” based on the “Achieved the Standard with Excellence” grade description.
- If the student struggles, they might receive a “1,” indicating that they are “Below the Standard.”
Benefits of Standards-Based Grading
- Transparency : Students and parents understand exactly what skills and knowledge are being assessed.
- Targeted Feedback : Teachers can provide detailed feedback on specific areas where a student is excelling or needs improvement.
- Focus on Mastery : The emphasis is on learning and growth rather than achieving a particular letter grade.
Setting up standards-based grading requires careful planning, but the transparency and clarity it provides to students, teachers, and parents make it an incredibly valuable approach to education.