Billing And Fees
- Assign Fee And Request Money
- Billing And Fee Management Setup
- How To Assign Fees To One Or More Students
- How To Integrate Quickbooks With CrownSIS
- How To Manually Register A Payment Of A Fee Against A Student
- How To Send A Money Request To Students Or Parents With A Payment Link
- How To Set Up Subscriptions In CrownSIS
- How To Use The Deposit Functionality In CrownSIS
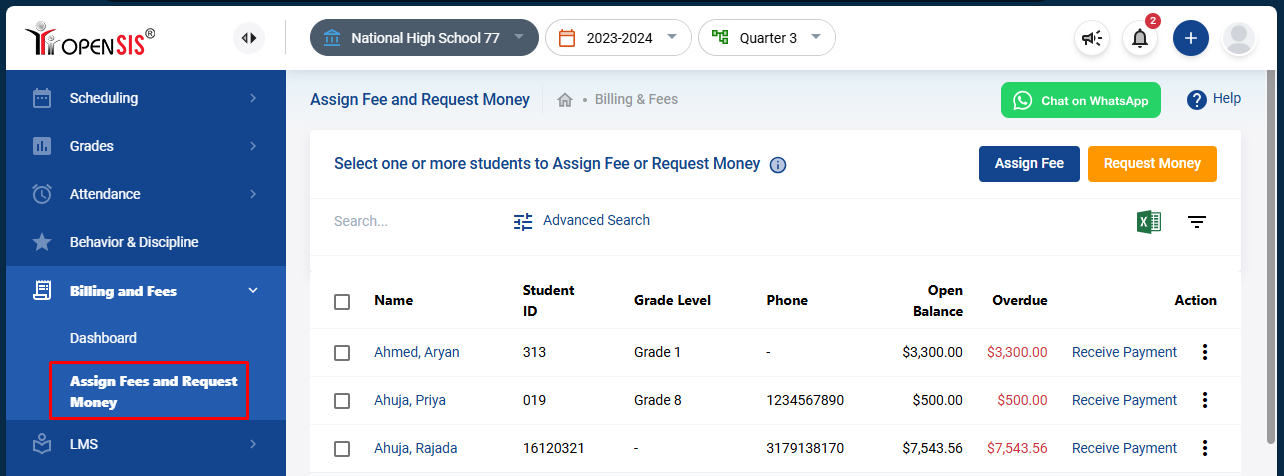
Assign Fee And Request Money

Before you can assign fees to students and receive payments, you must complete the initial settings. Learn how to set the billing items.
How to Assign Fees
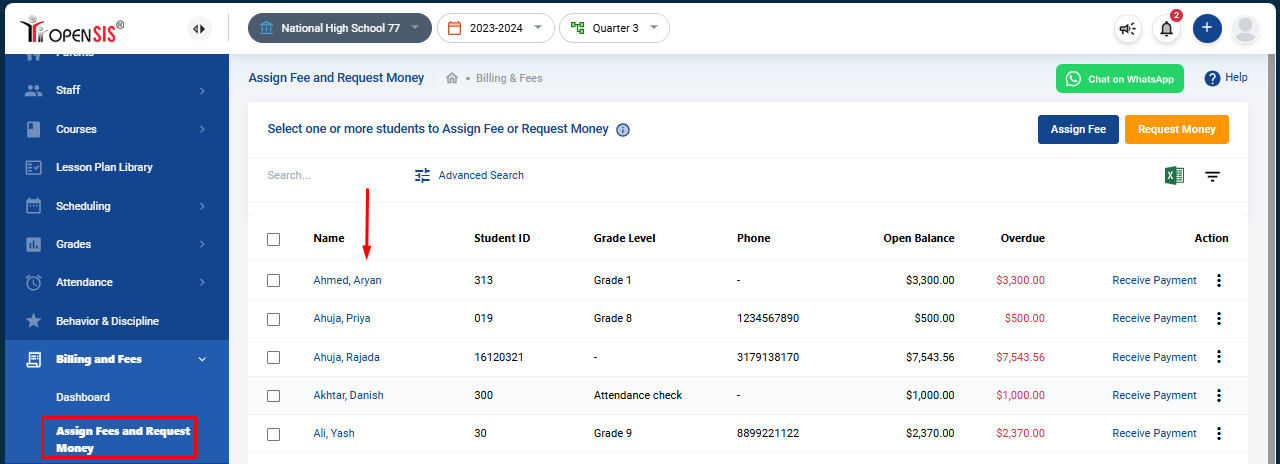
To assign fees to students, navigate to Main Menu >>Billing and Fees >>Assign Fee and Request Money
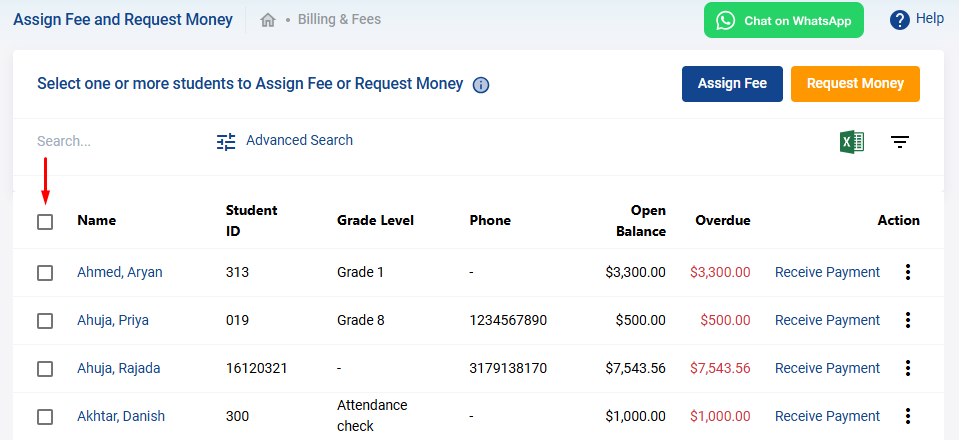
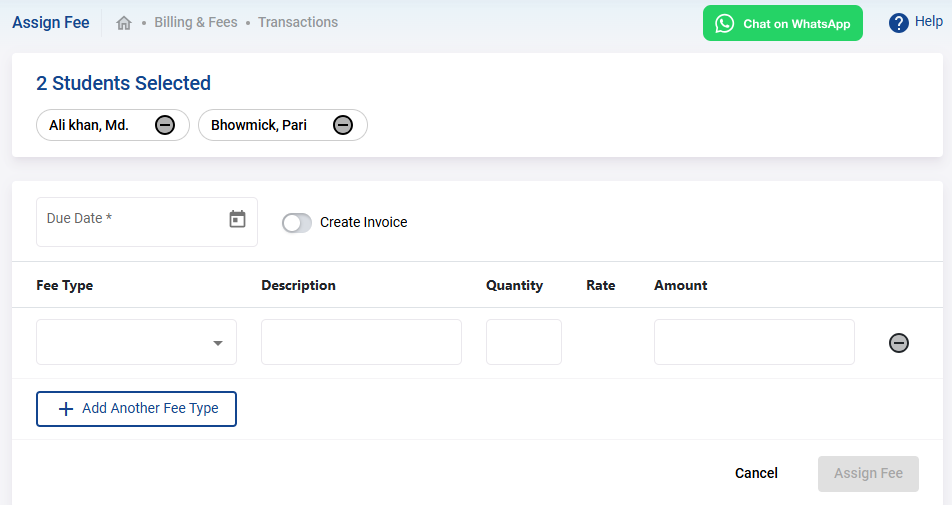
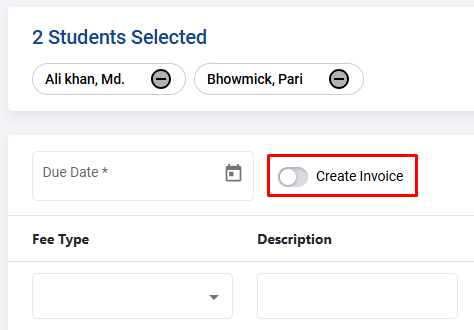
Search and select the students and click Assign Fee. On the screen, you will see the names of the selected students. You can remove anyone by clicking on the "-" sign.
-
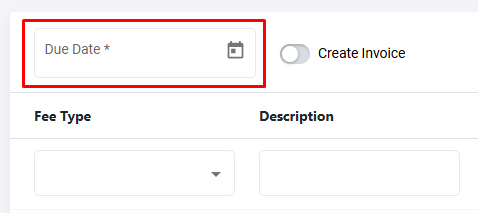
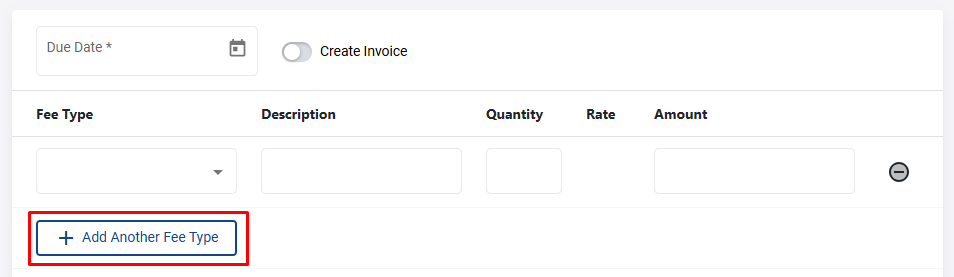
Enter the Due Date for the charges you are about to enter
-
Turn on the Create Invoice switch if you want to generate an invoice for the students
-
Select the Fee Type from the drop-down menu. The Description will be auto-filled if you have entered it in settings. If you have not, you can enter the description manually
-
Select the Quantity and the Amount will be auto-filled
-
To delete a line item, click on the "-" sign
-
To add multiple fee types, click on + Add Another Fee Type
-
Finally, click Assign Fee to assign the fee to the selected students.
Fees assigned to students will show on the Assign Fee and Request Money page. You will be able to receive payments directly from this page by clicking on Receive Payment. Under**** theAction menu, you will be able to Print an Account Statement for the student.
How to Deposit Funds
Students receive funds from many sources for education expenses. These funds can be deposited as a credit mount from the student’s general ledger screen.
- Click on a student’s name to open the ledger
- Click Fund Deposit
- Fill in theAmount
- Select the Deposit Type
- Enter the Deposit Date
- Enter the Fund Source , examples would be Scholarships, Grants, etc.
- Enter Funding Reason
- Click Submit to save
You will see that the Deposit amount will show on the transaction detail with the transaction date as well as on the account header.
You can edit the deposit transaction by clicking on Edit under the Action menu
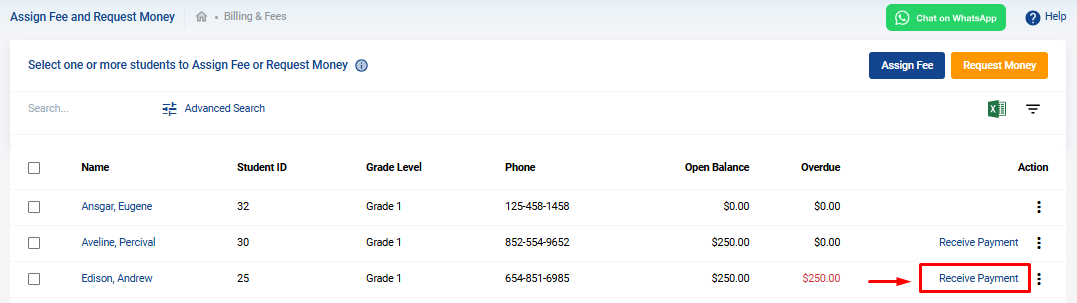
How to Receive Payments
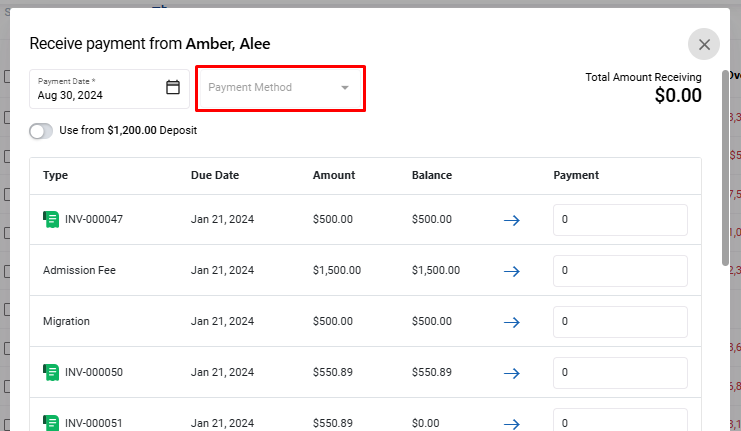
To receive payments and record them, navigate to the Assign Fees and Request Money screen. Here, you will see the list of students with open and overdue balances. Click on Receive Payment link to receive payment for outstanding fees of that student.
When the payment recording screen opens, you will be able to receive payments for a particular invoice, or a charge or all of the outstanding fees. Click Submit to save.
What is a Student Ledger?
The student ledger is an useful screen where it shows all the transactions between the student and the school. To get to the ledger, navigate to Assign Fees and Request Money screen and click on a student's name. The ledger will display with transactions if there are any.
At the top, the overview of the student's account is presented as given below:
Within the Date drop down, you have the ability to filter the transactions by preset days or by custom date range.
Below the overview bar, there is a search, filter, download to Excel and print options providing the following features:
-
Ability to search by fee type or amount
-
Ability to select the columns to display on the grid
-
Ability to print a statement of account
-
Ability to download the transactions as an Excel sheet
Under the Action menu, you can Receive Payment for a particular transaction. The triple dots menu offers additional features like:
-
Ability to Send Reminder about an outstanding charge
-
Ability to Print all the payments against a charge
-
Ability to Void a charge
-
Ability to Waive a charge
The Transaction column displays small icons as a visual queue for the type of transactions that were recorded.
Billing And Fee Management Setup
The Billing and Fee management module allows the school administrator to charge fees to students and receive payments. To get started with using this feature you have to first go to Main Menu >> Settings >> Billing and Fees.
There are three setup items:
What Is General Ledger (G/L) Accounts?
General ledger (G/L) accounts is an inventory of all the accounts that your school uses to code every individual transaction. It is an organizational tool. A good list of G/L accounts for school business can make it easier for your team to locate specific accounts, transactions, and more.
Your school's G/L accounts does not need to look like anyone else's—each school can customize its chart of accounts to best suit its bookkeeping needs. In fact, it's important to do just that; every single school has unique accounts and transactions.
Click on General Ledger (G/L) Accounts to set it up.
Here you will set up the chart of accounts which allows your school's accounting and/or bookkeeping team to categorize each transaction. If you do not have any accounts in the system already, click on the + Add New G/L Account. A form will open and you will need to fill in the G/L code, give it a name and an optional brief description. Click Submit to save.
Once you setup the G/L codes it will list it for you.
If you need to create one or more sub accounts under a main G/L account, then check the Is Sub-Account switch when creating the G/L account.
G/L account with sub accounts will look like below:
What are Fee Types?
Fee types are the types of charges or fees that you assign to your students. These fee types usually align with your G/L accounts and are more verbose so that users can understand them. However, each fee type must be associated with a G/L account so that the revenue collected is accounted for in the general ledger for accounting and tax purposes.
To add a new fee type, click on + Add New Fee Type. **** Fill out the form with relevant information. Here the G/L account is mandatory. If you have a G/L sub account, you can select and assign that too. Click Submit to save.
After you enter several Fee Types , it will look like this:
What are Payment Types?
Payment types are the methods of payments your institution accepts from Students and Parents for the payment of invoices and charges. Most common payment types are Cash, Check, Credit and Debit Card, Electronic Fund Transfer (EFT).
Click + Add New Payment Type to get started. Fill in the Payment Type and a short description. Click Submit to save.
After you add a few Payment Types, the data grid will look like this:
Now that you have completed the basic setup, you are ready to assign fees to students and accept payment. Follow this article on how to assign fee to one or more students, create invoices, and receive payments. How to assign fees and receive payments.
How To Assign Fees To One Or More Students
Assigning fees to students in CrownSIS is a straightforward process that ensures accurate billing and efficient fee management. Here's a step-by-step guide on how to assign fees to one or more students.
Step 1: Access the Billing and Fees Section
-
Log in to your CrownSIS account.
-
From the navigation menu, go to Billing and Fees.
-
Select the Assign Fees and Request Money sub-menu.
This will bring up a list of students who are eligible to have fees assigned.
Step 2: Select Students
- Review the list of students and select those to whom you wish to assign fees. You can select multiple students if needed.
Step 3: Assign Fees
-
Click on "Assign Fees":
- Once you’ve selected the students, click on the Assign Fees button located at the top right corner.

-
Fill Out the Fee Assignment Form:
- Fee Type : Choose the fee type from the dropdown menu. The available fee types will be those you have already set up in the billing setup.
- Description : Provide a brief description of the fee being assigned.
- Quantity : Enter the quantity if applicable.
- Amount : The amount will auto-populate based on the fee type setup. However, you can edit this amount if you need to assign a lower fee.
-
Set a Due Date:
- Enter the due date by which the students are required to pay the fee.
-
Create an Invoice (Optional):
- If you wish to send an invoice to the students, toggle the Create Invoice switch.
-
Adjust Selections if Needed:
- If you need to remove a student from the list, click the remove icon beside their name.
- To assign additional fees to the same group of students, click on the Add Another Fee Type button. This will allow you to add another fee with the same options.
Step 4: Finalize and Assign Fees
Once you’ve completed all the necessary fields and reviewed the information, submit the form to assign the fees to the selected students.
By following these steps, you can efficiently assign fees to one or more students in CrownSIS, ensuring that billing is accurate and up to date.
How To Integrate Quickbooks With CrownSIS
Integrating QuickBooks with CrownSIS allows you to automate and streamline financial operations like student billing, payment tracking, and fee reconciliation. This guide walks you through the entire setup process—from configuring your QuickBooks Developer account to activating the integration inside CrownSIS.
Step 1: Access the Intuit Developer Portal
To begin, access the Intuit Developer Portal:
-
Sign in using your Intuit credentials.
-
Once logged in, you’ll land on the workspace dashboard.
-
You can either:
-
Use the default sample workspace provided by Intuit
-
Or create a new workspace for your institution
-
Step 2: Create Your QuickBooks App
Now, create an application to enable the integration:
-
Inside the workspace, click Create an App.
-
Give your app a name (e.g., “CrownSIS Integration”).
-
Select QuickBooks Accounting API and grant all required permissions.
After creation:
-
QuickBooks will generate a Client ID and Client Secret.
-
Use the visibility toggle to view and copy them.
-
Store these credentials securely, as you'll need them in CrownSIS.
Set the Redirect URI:
-
Go to App Settings → Keys and Credentials.
-
In the Redirect URI section, enter the URI provided in CrownSIS documentation or by support.
-
Save the changes.
Step 3: Configure CrownSIS with QuickBooks Credentials
Now, use the credentials inside CrownSIS:
-
Log in to CrownSIS as a Super Administrator.
-
Navigate to: Settings → Billing and Fees → Integrate with QuickBooks.
-
Enter the Client ID and Client Secret copied from the QuickBooks Developer Portal.
-
Choose your environment:
-
Sandbox for testing
-
Production for live data
-
-
Click Save.
Step 4: Connect to QuickBooks
After saving:
-
Click the Connect to QuickBooks button.
-
You’ll be redirected to the QuickBooks authentication screen.
-
Sign in if prompted, and select the company you want to connect.
-
Once connected, you’ll see your company’s name, address, and time zone appear in CrownSIS.
This confirms the connection was successful.
Step 5: Enable Synchronization
To activate real-time syncing:
-
Locate the Sync Toggle Switch in the QuickBooks integration area.
-
Turn it ON to enable continuous syncing.
Important:
If this toggle is left off, integration won’t function. Student billing and fee data will not sync between CrownSIS and QuickBooks.
Integration Complete
Your CrownSIS system is now successfully integrated with QuickBooks. Billing data will sync automatically, helping your institution reduce manual work and maintain accurate financial records.
Need Help?
For assistance, contact us at: opensishelp@os4ed.com
Visit: https://CrownSIS.com
How To Manually Register A Payment Of A Fee Against A Student
Manually registering a payment in CrownSIS ensures that all student fees are accurately tracked and recorded. Here’s a step-by-step guide on how to register a payment against a student's fee.
Step 1: Access the Billing and Fees Section
-
Log in to your CrownSIS account.
-
From the navigation menu, go to Billing and Fees.
-
Select the Assign Fees and Request Money sub-menu.
This will display a list of students and their respective fees.
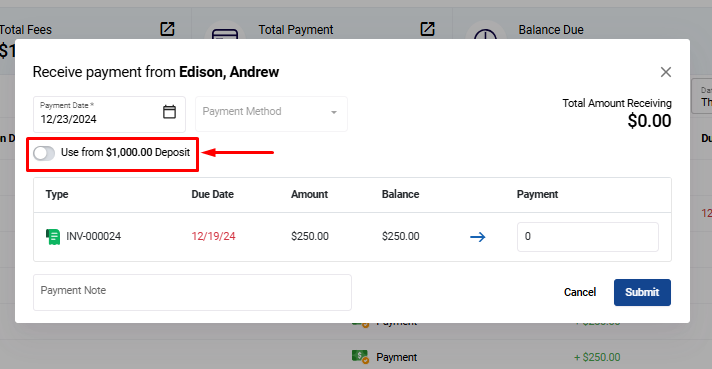
Step 2: Receive Payment
-
Click on "Receive Payment":
- In the row corresponding to the student you wish to register a payment for, click the Receive Payment link.
- This will open a detailed view of all the unpaid fees assigned to that student.

-
Adjust Fees with Student Deposit (Optional):
- If the student has a deposit that you wish to use to adjust the fee, switch ON the Use the deposit toggle.

-
Enter Payment Details:
- Enter the Amount Received against each respective fee.
- Select the Payment Type from the dropdown menu, which you have previously set up in the billing settings.
Step 3: Finalize and Save the Payment
- Once you’ve entered all the payment details, review the information.
- Click on Submit to save the payment record.
By following these steps, you can efficiently register payments manually in CrownSIS, ensuring that all student fee records are kept up-to-date and accurate.
How To Send A Money Request To Students Or Parents With A Payment Link
Sending a money request to students in CrownSIS allows you to efficiently collect payments for fees via email. The request includes a payment link, making it easy for students and their parents to complete the transaction. Here’s how to send a money request in CrownSIS.
Step 1: Access the Billing and Fees Section
-
Log in to your CrownSIS account.
-
From the navigation menu, go to Billing and Fees.
-
Select the Assign Fees and Request Money sub-menu.
This will display a list of students who are eligible to receive a money request.
Step 2: Select Students
- Review the list of students and select the ones you wish to send the money request to. You can select multiple students at once.

Step 3: Request Money
-
Click on "Request Money":
- After selecting the students, click on the Request Money button located at the top right corner.
-
Fill Out the Money Request Form:
- Fee Type : Choose the fee type from the dropdown menu. The available fee types are based on those you’ve set up in the billing setup.
- Description : Provide a brief description of the fee.
- Due Date : Enter the due date by which the payment should be made.
-
Send Payment Link:
- By default, the payment link will be sent to both the students and their parents via email.
- If you want to send the payment link only to the students, turn ON the Send payment link to students only switch.
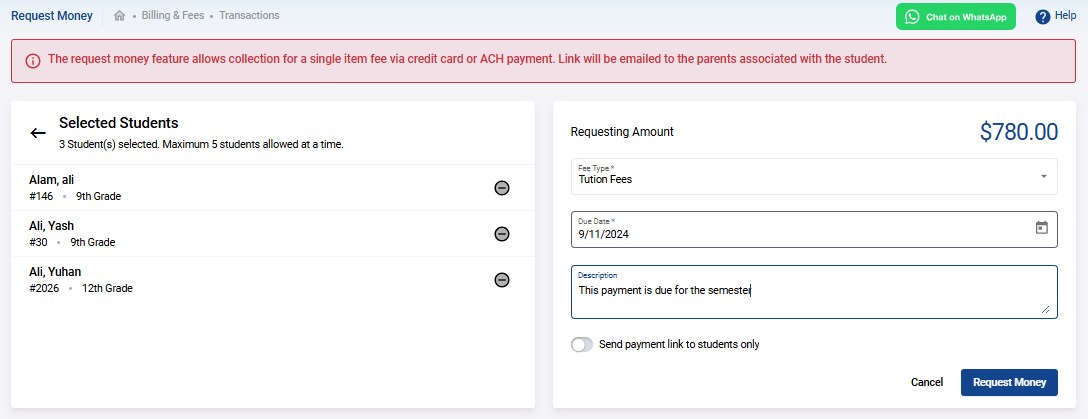
Step 4: Finalize and Send the Money Request
- Once you’ve filled in the necessary details, review the information, and click on Submit to send the money request.
The payment link included in the email allows payment via credit card or ACH, making it convenient for students and parents to fulfill the payment request.
By following these steps, you can easily send money requests to students with a payment link in their email, streamlining the payment collection process in CrownSIS.
How To Set Up Subscriptions In CrownSIS
What is a Subscription?
A subscription is a recurring payment charged to a user at specified intervals. In CrownSIS, this feature enables schools to set up automatic deductions of subscription fees from student accounts. For the system to work seamlessly, schools need to have a Stripe account connected to CrownSIS. Without a Stripe account, the school cannot receive subscription payments. Therefore, connecting Stripe is the first step to setting up subscriptions.
Step 1: Connect a Stripe Account
If your school has not already connected a Stripe account, you need to do so before setting up subscriptions. This connection is required to process payments directly from the student’s account to the school’s account. You can easily connect your Stripe account in CrownSIS by navigating to Settings and configuring the Online Payment Acceptance under Billing and Fees. Follow the prompts to connect your Stripe account or Go through the following article.
Step 2: Set Up Subscription Items
Once Stripe is connected, you can set up the subscriptions that you would like to offer to students.
- Go to Settings and then to Billing and Fees.
- Select Setup Online Subscriptions.
- Click on Add Subscription Item to create a new subscription item.
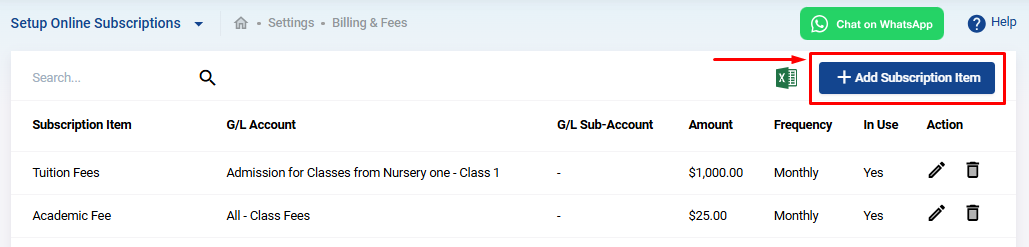
You will be asked to fill out the following details:
- Title : Name of the subscription.
- G/L Account : The General Ledger account to which this subscription is linked.
- Sub Account : Any sub-account related to the G/L account.
- Amount : The subscription fee to be charged.
- Frequency : Choose how often the amount will be charged. Options include daily, weekly, monthly, or yearly.
- Description : Provide a short description of the subscription.
- In Use : Toggle this switch to activate the subscription. Only active subscriptions will be visible to students.
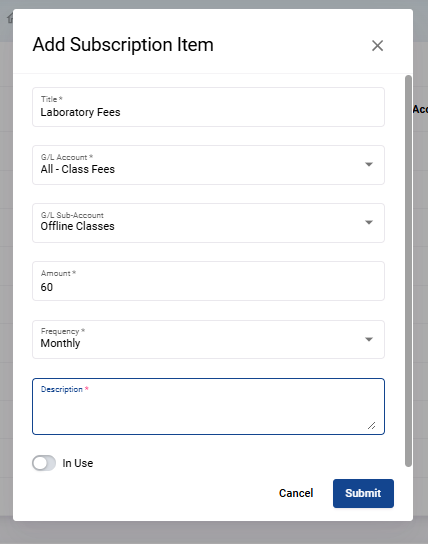
Once you've completed these fields, click Submit. The subscription item will be created both in CrownSIS and automatically synced to your Stripe account.
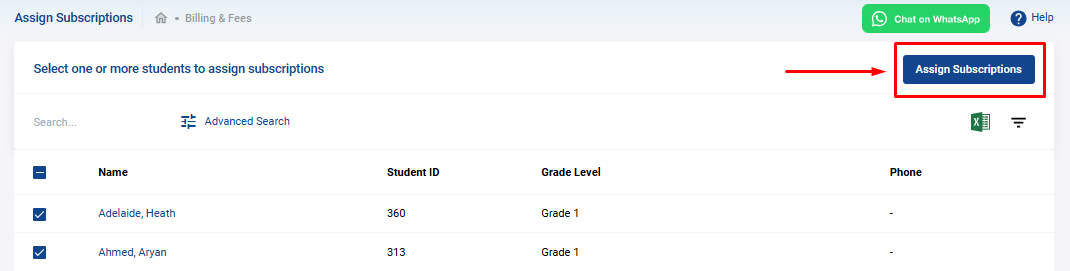
Step 3: Assign Subscriptions to Students
With the subscription items in place, the next step is to assign them to students:
- Go to Billing and Fees and select Assign Subscriptions.
- A list of students will populate. Select the students you wish to assign subscriptions to.
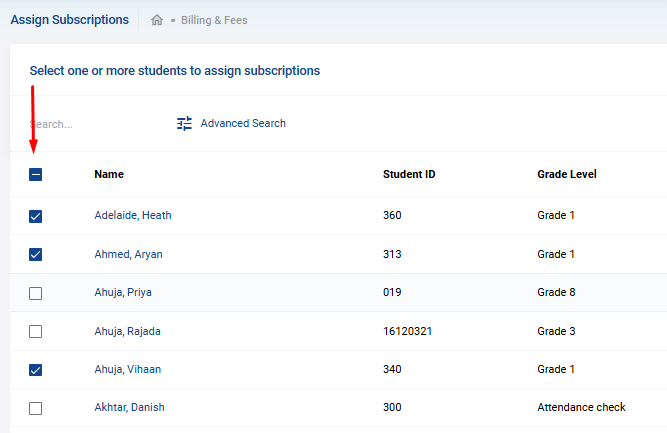
- Click on Assign Subscriptions and you'll be redirected to a form where you can choose the subscription items to assign.
- You may assign multiple subscriptions by clicking Add another Subscription Item. The total amount will update automatically.
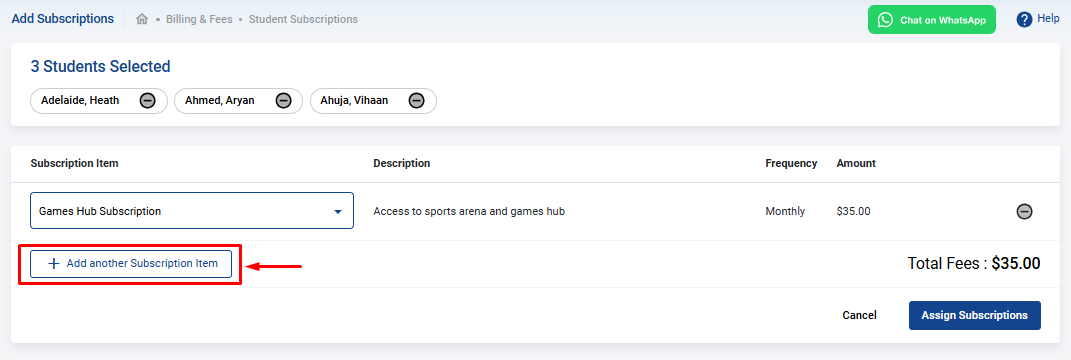
- After selecting the subscription(s), click Assign Subscription to finalize.
Step 4: Student Activation of Subscriptions
The subscription will not start until the student activates it. Here's what students need to do:
- The student will go to Billing and Fees and click on My Subscriptions.
- A list of the assigned subscriptions will appear.
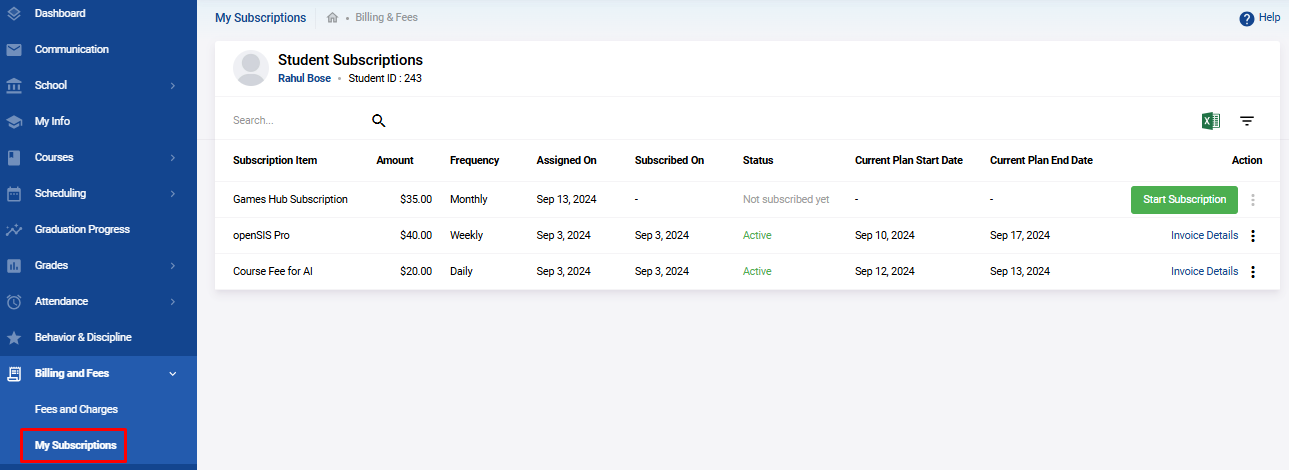
- If the student has not yet completed any online transactions in CrownSIS, they will first need to enter their card details to connect their account with Stripe.
- Once the payment details are entered, the student can click Start Subscription to activate it.

- The student can also view the invoice details for any subscription by clicking on Invoice Details.
Step 5: Managing Subscriptions
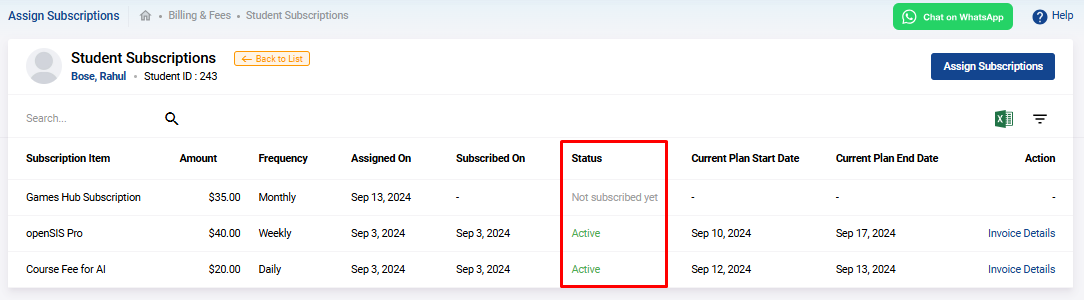
Once a student activates a subscription, administrators can track the status of the subscription:
- Go to Billing and Fees and select Assign Subscriptions.
- Select the student, and on the details page, you’ll see the status of the subscription marked as "Active," along with the start and end dates of the subscription.
The subscription model in CrownSIS allows for a seamless and automated process for charging students recurring fees. By integrating with Stripe, the system ensures that payments are securely processed, with minimal manual intervention. Once set up, administrators can easily assign, manage, and monitor subscriptions, while students can activate and pay for subscriptions directly from their account.
How To Use The Deposit Functionality In CrownSIS
The deposit functionality in CrownSIS provides a streamlined way for students to manage scholarship funds, prize money, or other financial contributions by depositing these amounts into their CrownSIS accounts. These funds can then be used to settle fees assigned to them. Here’s a step-by-step guide to using this feature.
Depositing Funds into a Student Account
** For Students:**
-
Log in to the Student Portal:
- Students must log in to their CrownSIS portal using their credentials.
-
Navigate to the Billing Section:
-
Go to Billing and Fees in the main menu.
-
Select Fees and Charges from the dropdown.
-
-
Initiate Fund Deposit:
- Locate and click the Fund Deposit button.
- Locate and click the Fund Deposit button.
-
Enter Deposit Details:
-
Enter the amount to be deposited.
-
Provide a brief description for the fund (e.g., "Inter-School Chess Competition prize money").
-


-
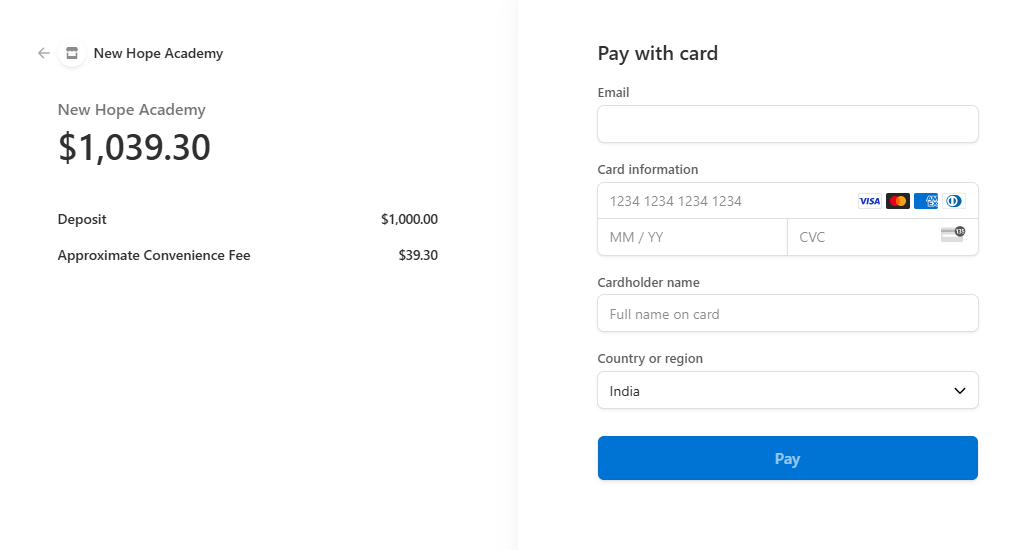
Complete Payment:
-
Fill in the card details in the payment form.
-
Submit the form to complete the deposit process.
-
-
Confirmation:
- Once submitted, the deposited amount will be credited to the student’s CrownSIS account balance.
For School Administrators:
-
Log in to the Admin Portal:
- Administrators must log in to their CrownSIS admin profile.
-
Navigate to the Billing Section:
-
Go to Billing and Fees in the main menu.
-
Select Assign Fees and Request Money from the dropdown.
-
-
Select a Student:
- From the list of students, select the student on whose name you wish to deposit funds.
-
Access the Student's Ledger:
-
The student’s ledger screen will appear.
-
In the top right corner, click on Fund Deposit.
-
-
Enter Deposit Details:
-
Enter the amount to be deposited.
-
Fill in the payment method, deposit date, fund source, and funding reason.
-

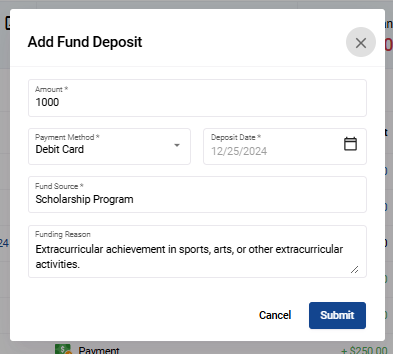
-
Submit the Deposit:
- Click on Submit , and the amount will be added to the student’s fund deposit.
Using Deposited Funds to Settle Fees
-
Assigning Fees to the Student:
- The admin assigns a fee to the student through the Assign Fees and Request Money option in the Billing and Fees section.
-
Adjusting the Fee with Deposited Funds:
-
The admin navigates to the assigned fee for the specific student.
-
Click the Receive Payment button for the fee.
-
-
Activate the Deposit Adjustment:
-
In the payment form, switch on the Use Deposit toggle.
-
Submit the form to deduct the fee amount from the student’s deposited balance.
-
-
Confirmation:
- The fee will be marked as settled, and the deposited balance will be updated accordingly.
By leveraging the deposit functionality in CrownSIS, students and administrators can simplify financial transactions, ensuring a seamless and transparent process for managing educational expenses.